
Image Based Lighting Part 1
- jimht3
- Jun 22, 2021
- 4 min read
This post will primarily reference Cinema 4D R23 and it's approach to physically based rendering. If it helps you understand what is happening in other 3D rendering programs, great.

In the above image, I've grabbed a bunch of stock objects from the Cinema 4D content browser, slightly adjusted their textures to suit the rendering method I'm going to talk about, (more on that later) and lit them with a high dynamic range image I grabbed from Paul Debevec's Light Probe Gallery. No other light sources were used, no global illumination setup, nothing fancy. I used the reflectance rendering mode in the Physical Renderer, using image based lighting.
What is image based lighting? Well, instead of lighting a scene with discrete lights and lamps that you place and control, image based lighting takes all of the lighting cues from a high-dynamic range image and uses that to light the scene. The result can be very realistic, because without doing much else, all effects of direct lighting sources (such as the sun or lamps in a room) as well as ambient sources (such as the sky, reflections off nearby surfaces) can be accounted for. What is high-dynamic range? It's an image that's been built up from multiple exposures so that the final image contains the entire range of possible illumination - from the dimmest lights to the full light of the sun. If you search the internet for HDR images, you'll find a lot of such images suitable for rendering for free. This is what the image I used to light my random objects looks like:

Now, there's a bit of a cheat going on here, and often this cheat gets glossed over in other articles you'll see on IBL but I'm here to point it out, and how to make this process work in other situations that are not so "ideally" suited to this kind of setup.
To illustrate, here's another HDRi image I'm going to use to light up this same scene. I got this from the sIBL gallery, and if you poke around on that site you might start to get an idea why I wrote this post.

Lets render with this as our lighting setup, simply substituting one image for the other. It's a nice day, with a bright sun. It should look fantastic, right?

What happened? Where did we go wrong? Where are the strong highlights and shadows we should be getting from that strong sunlight? Why did the Uffizi gallery probe work so well, and this one was such a disaster? It's complicated, but only a little bit. Here's the same scene, same assets, fixed up, so you know where we're headed:

No, I didn't add in a light source to the scene. Well, kind of. This is all pure physically based rendering - no light sources. What I added was 'focus' so that the renderer could find the sun. Here's the explanation: In a physically based render, all surfaces in the scene that are visible to the camera (directly, through transparency, or via reflection) send out a few rays in random directions, and the renderer records what is reflected (or refracted) when those rays encounter something. In the case of the Uffizi probe image, you'll notice that a lot of the image is taken up with a very uniform overcast sky. Not only does this account for the lack of sharp, direct shadows in the resulting render, but it accounts for the overall even lighting. For every point on every surface in my scene, rays cast out in random directions are still bound to find the sky quite readily, and light the surface appropriately.
In the second image lit by the desert sun, random rays cast out from every surface are mostly going to see deep blue sky. The sun is a tiny spot in the sky, once you get past the glare and streaks. Hardly any rays will connect with the sun, and the resulting render is going to be dark and missing the effects of a strong, directional light source on the picture. For most of the rays cast in the second rendering, the sun didn't exist at all. You can improve on this situation in a couple of ways: you can increase the number of rays that are cast to increase the chances of finding the source, or you can give the renderer a hint as to where the strong source is. (There is a third way not used in Cinema 4D's rendering engine where the renderer can figure out for itself where the 'important' directions are for casting rays, but we won't cover that here.) Increasing the number of rays will make the rendering take a really long time, so we'll opt for the simpler approach. It just takes a bit of setup. First things first.
You can't just put an HDR image into Cinema 4D and use it without a little preparation. First we have to make sure to use the right rendering engine. Open up the rendering options in C4D, select the Physical rendering engine. Leave everything at the defaults for now. Also, go down to the Effect... button and add the Denoiser effect.

OK, now we are going to construct our rig to help the rendering engine out a little and give our image the best chance of success.
In a new project, you'll need to add 2 Sky objects, two null objects, two cameras, and a disk object. Name and arrange these items in the asset manager like so:

Every object besides the Scene Camera should be located at 0,0,0 with rotation values of 0,0,0. Add Rendering/Compositing tags to the two sky objects. For the Global Sky object, set these values in the Compositing Tag:
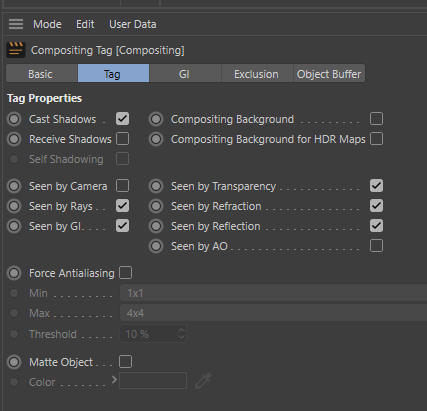
For the Visible Sky object, set these values in the Compositing Tag:

The Sun object needs the following object properties and positioning:

Continued in Part 2
Comments